
Introduction: Study Abroad Application Timeline for Sri Lankans
Planning your study abroad application is not something you should leave for the last minute. From choosing the right country to securing your study abroad visa, every step takes time, research, and proper execution. Many students in Sri Lanka struggle not because of a lack of opportunities, but because they start too late or miss key deadlines.
A clear timeline helps you stay organized and avoid common mistakes. When you plan early, you get enough time to research universities, prepare for exams, arrange documents, and manage finances. This also increases your chances of getting into top universities and reduces stress during the final stages of your application.
The study abroad journey includes multiple steps—shortlisting courses, preparing for IELTS/TOEFL, submitting applications, and handling visa requirements. Each of these steps has its own timeline, and missing even one can delay your entire plan.
This is where the right guidance becomes important. Many students choose to work with study abroad consultants to simplify the process. With expert support, you can avoid confusion, save time, and focus on making better decisions. Our experienced visa consultants help you handle the entire study abroad visa process smoothly, ensuring your documentation and application are done correctly without unnecessary delays.
In this guide, you’ll understand the ideal timeline to follow so you can plan your study abroad journey with clarity and confidence.
Why You Should Start Early
Starting your study abroad application early gives you a clear advantage. It’s not just about meeting deadlines—it’s about making smarter decisions with enough time in hand. Many Sri Lankan students rush the process and end up compromising on university choices, missing scholarships, or facing delays in their study abroad visa.
When you begin your study abroad journey early, you get the flexibility to plan each step properly instead of reacting under pressure.
Here’s why early planning matters:
Better University Options
You get enough time to research and shortlist universities that match your goals, instead of settling for limited choices.
Higher Chances of Admission
Early applications often have better acceptance rates, especially for competitive programs.
Time for Test Preparation
Exams like IELTS/TOEFL need proper preparation. Starting early improves your score and strengthens your profile.
Access to Scholarships & Funding
Many scholarships have early deadlines. Planning ahead increases your chances of securing financial support.
Smooth Documentation Process
Collecting academic records, SOPs, and recommendation letters takes time. Early planning avoids last-minute errors.
Hassle-Free Study Abroad Visa Process
Visa applications can be complex. Starting early ensures you have enough time to arrange financial proof and documents without stress.
Expert Guidance When You Need It
Working with study abroad consultants early helps you avoid common mistakes. With the right strategy and support, your entire process becomes more efficient.
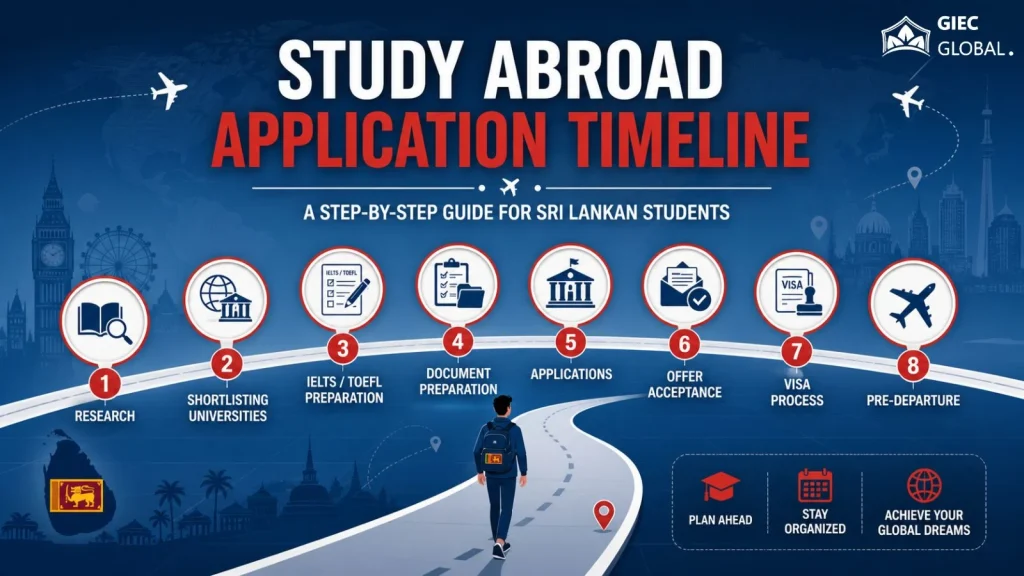
Step 1: Research Countries and Courses (18–24 Months Before)
This is the foundation stage of your entire journey. The decisions you make here will shape your career, expenses, and overall experience. Instead of following trends or copying others, focus on what actually fits your goals.
Start by identifying what you want to study and why. Your course should align with your past education, skills, and long-term career plans. Once that’s clear, move on to choosing the right country based on practical factors—not just popularity.
Here’s how you can approach this step:
Define Your Career Goal
Choose a course that supports your future job opportunities, not just something that sounds attractive.
Compare Countries Based on Outcomes
Look at job markets, post-study work opportunities, and industry demand in each country.
Understand Cost vs Value
Evaluate tuition fees, living expenses, and return on investment instead of focusing only on low-cost options.
Check Entry Requirements
Different countries and universities have different academic and language requirements. Make sure you qualify.
Explore Course Structure
Review subjects, practical exposure, internships, and flexibility in the curriculum.
Look at Lifestyle & Environment
Climate, culture, safety, and part-time work opportunities also impact your overall experience.
Shortlist 2–3 Strong Options
Avoid confusion by narrowing down to a few well-researched choices instead of keeping too many options.
Step 2: Shortlist Universities (12–18 Months Before)
Once you’ve selected your preferred country and course, the next step in your study abroad application is to shortlist the right universities. This stage is critical because your final choices directly impact your admission chances, costs, and even your study abroad visa approval.
Instead of applying randomly, focus on creating a balanced list of universities based on your profile and goals.
Here’s how to shortlist effectively:
Divide Universities Smartly
Create a mix of ambitious, moderate, and safe options to increase your chances of acceptance.
Check Entry Requirements Carefully
Review academic scores, English test requirements, and any additional criteria before applying.
Compare Tuition Fees & Living Costs
Choose universities that fit your budget to avoid issues later during the study abroad visa process.
Look at University Rankings & Reputation
Focus on course-specific rankings and industry recognition rather than just overall rankings.
Review Placement & Career Support
Check internship opportunities, job placement rates, and employer connections.
Understand Application Deadlines
Missing deadlines can delay your entire study abroad application, so keep track of timelines.
Check Visa Success Factors
Some universities have better visa approval rates due to credibility and compliance history.
Many students find this stage confusing, which is why working with experienced study abroad consultants can make a big difference. With expert guidance, you can shortlist universities that match your profile and improve both admission and study abroad visa success chances.
Step 3: Prepare for IELTS/TOEFL (10–12 Months Before)
English proficiency tests are a key requirement for most international universities. Your score can directly impact your admission chances, so this stage needs focused preparation—not last-minute effort.
Start by understanding which test is required and the minimum score needed for your selected universities. Then plan your preparation based on your current level and target score.
Here’s how to approach this step effectively:
Choose the Right Test
Check whether your universities accept IELTS, TOEFL, or both, and pick the one that suits you better.
Set a Target Score
Aim higher than the minimum requirement to strengthen your profile and improve your chances.
Create a Study Plan
Allocate time daily for reading, writing, listening, and speaking practice.
Use Reliable Study Resources
Practice with official materials, mock tests, and sample questions to understand the exam format.
Focus on Weak Areas
Identify where you struggle and spend extra time improving those sections.
Take Mock Tests Regularly
This helps you manage time, reduce exam stress, and track your progress.
Book Your Test Early
Slots can fill quickly, especially during peak seasons, so schedule your exam in advance.
Step 4: Get Documents Ready (8–10 Months Before)
At this stage of your study abroad application, documentation becomes your top priority. Even a small mistake or missing document can delay your admission or create issues during your study abroad visa process. Preparing everything early helps you stay organized and avoid last-minute stress.
Your documents are what universities and visa authorities use to evaluate your profile, so accuracy and clarity matter.
Here’s what you should focus on:
Academic Documents
Collect transcripts, certificates, and mark sheets from your previous education. Ensure they are complete and properly attested.
Statement of Purpose (SOP)
Write a clear and structured SOP explaining your goals, course choice, and future plans.
Letters of Recommendation (LORs)
Request LORs from professors or employers early, as they may take time to prepare.
Valid Passport
Make sure your passport is updated and valid for the entire duration of your studies.
Resume/CV
Prepare a well-structured CV highlighting your academic background, skills, and achievements.
Financial Documents
Start arranging proof of funds, bank statements, or sponsorship documents needed for your study abroad visa.
Application Forms & Supporting Files
Double-check all details before submission to avoid errors in your study abroad application.
Step 5: Apply to Universities (6–8 Months Before)
This is the stage where all your preparation turns into action. After finalizing your university list and preparing your documents, it’s time to submit your applications carefully and on time.
Accuracy and timing are key here. Even a small mistake or delay can affect your chances, so focus on submitting strong and complete applications.
Here’s how to approach this step:
Apply Before Deadlines
Don’t wait for the last date. Early submissions can improve your chances and give you more response time.
Fill Applications Carefully
Double-check all details, including personal information, academic records, and uploaded documents.
Customize Your SOP for Each University
Avoid using the same statement everywhere. Tailor it based on the course and university focus.
Track Application Status
Keep checking your email and application portals for updates or additional requirements.
Respond Quickly to University Requests
Some universities may ask for extra documents or clarification—respond without delay.
Pay Application Fees on Time
Ensure your payment is completed successfully to avoid rejection due to incomplete submission.
Keep Backup Options Ready
Don’t rely on just one or two applications—having multiple options reduces risk.
Step 6: Accept Offer & Plan Finances (4–6 Months Before)
Once you start receiving admission offers, the next step in your study abroad application is to choose the best option and confirm your seat. This decision should not be rushed—compare all factors carefully before accepting an offer.
At the same time, financial planning becomes critical, as it directly impacts your admission confirmation and study abroad visa process.
Here’s how to handle this stage effectively:
Compare All Offers
Look at tuition fees, course structure, location, career opportunities, and overall return on investment before making a decision.
Accept the Best-Fit University
Once finalized, accept the offer within the deadline and pay the required deposit to secure your seat.
Understand Total Cost Clearly
Calculate tuition fees, living expenses, travel costs, and other expenses to avoid surprises later.
Arrange Funds Properly
Start preparing your financial proof—this is essential for your study abroad visa approval.
Explore Funding Options
Check scholarships, education loans, or sponsors to manage your expenses efficiently.
Plan Currency & Payments
Be aware of exchange rates, payment methods, and timelines for fee transfers.
Get Expert Support if Needed
Many students take guidance from study abroad consultants to manage finances and documentation correctly. This reduces errors and makes the study abroad visa process smoother.
Step 7: Apply for Student Visa (2–4 Months Before)
This is one of the most important stages in your journey. Even if you have secured admission, your plan depends on getting your visa approved. That’s why this step needs careful attention, accuracy, and proper timing.
Start your visa process as soon as you receive all the required documents from your university. Avoid delays, as visa processing times can vary depending on the country and season.
Here’s how to handle this step effectively:
Understand Visa Requirements
Each country has different rules, documents, and procedures. Go through the official guidelines carefully.
Prepare All Required Documents
This usually includes your offer letter, financial proof, passport, academic records, and test scores.
Show Strong Financial Proof
Make sure your funds are clear, genuine, and meet the required amount.
Fill the Application Form Accurately
Even small errors can lead to delays or rejection, so double-check everything before submission.
Book Biometrics & Appointments Early
Slots can fill quickly, especially during peak intake periods.
Prepare for Visa Interviews (if required)
Be clear about your study plans, course choice, and future goals.
Track Your Application Status
Stay updated and respond quickly if any additional documents are requested.
Step 8: Final Pre-Departure Checklist (1–2 Months Before)
You’re almost at the final stage of your study abroad application. With your admission confirmed and study abroad visa approved, this step is all about preparing for a smooth transition to your new country.
Many students overlook small details at this stage, which can create problems after arrival. A clear checklist helps you stay organized and confident before departure.
Here’s what you should focus on:
Arrange Accommodation
Confirm your housing—university dorms or private accommodation—before you travel.
Book Your Flights Early
Booking in advance helps you save money and secure better travel options.
Carry All Important Documents
Keep your passport, visa, admission letter, financial proof, and academic documents in your cabin bag.
Manage Your Finances
Arrange forex, international debit/credit cards, and some local currency for initial expenses.
Get Health Insurance
Many countries require valid health insurance before arrival.
Pack Smartly
Carry essential clothes, documents, and basic items based on the country’s climate and lifestyle.
Attend Pre-Departure Guidance
Many students benefit from sessions conducted by study abroad consultants, where you get practical tips on travel, safety, and settling in.
Stay Connected
Activate international roaming or plan a local SIM option for communication after landing.
It’s best to start at least 18–24 months before your intended intake. This gives you enough time for research, test preparation, applications, and visa processing without rushing.
The full process usually takes 12–18 months, depending on your preparation level, course requirements, and the country you choose.
In most cases, yes. However, some universities may waive English test requirements based on your academic background or previous education in English.
You should apply for your visa around 2–4 months before your course starts, once you receive your admission confirmation and have all required documents ready.
Yes, experienced study abroad consultants can guide you with university selection, documentation, and the study abroad visa process, reducing errors and saving time.
Common mistakes include starting late, missing deadlines, submitting incomplete documents, choosing the wrong course, and not planning finances properly.